Jump To:
Clients
- I’m trying to add a service authorization, but I keep getting an error message about the diagnosis code.
- Why can't I find my client in the lookup?
- How do I add a diagnosis code?
- What do I do if a client, or employee, does not have a middle name but I need to enter one (for the payer)?
- What if my patient could be seen in multiple address?
Service Auths
- How do I update an existing service authorization (SA)?
- When should I use the "Add a New Line" button in a service authorization (SA)?
- What does the waiver checkbox in a service authorization do?
- What do I do when a Service Auth expires, but the new one hasn't come in yet?
- What are Banked Hours?
- How do I customize the services associated with my procedure codes?
Client Care Giver - What is the difference between EVV and geo tracking?
- What is the minimum distance recommended when using geo tracking?
- How do I enable community visits?
- How do I remove the client signature requirement?
Clients
I’m trying to add a service authorization, but I keep getting an error message about the diagnosis code.

A. This error message means that the principal diagnosis that the client has in their profile is different from what is on the Service Authorization. To find you patient's principal diagnosis Check in the client’s profile (CRM>Clients>View Clients) under the “Diagnosis” heading.
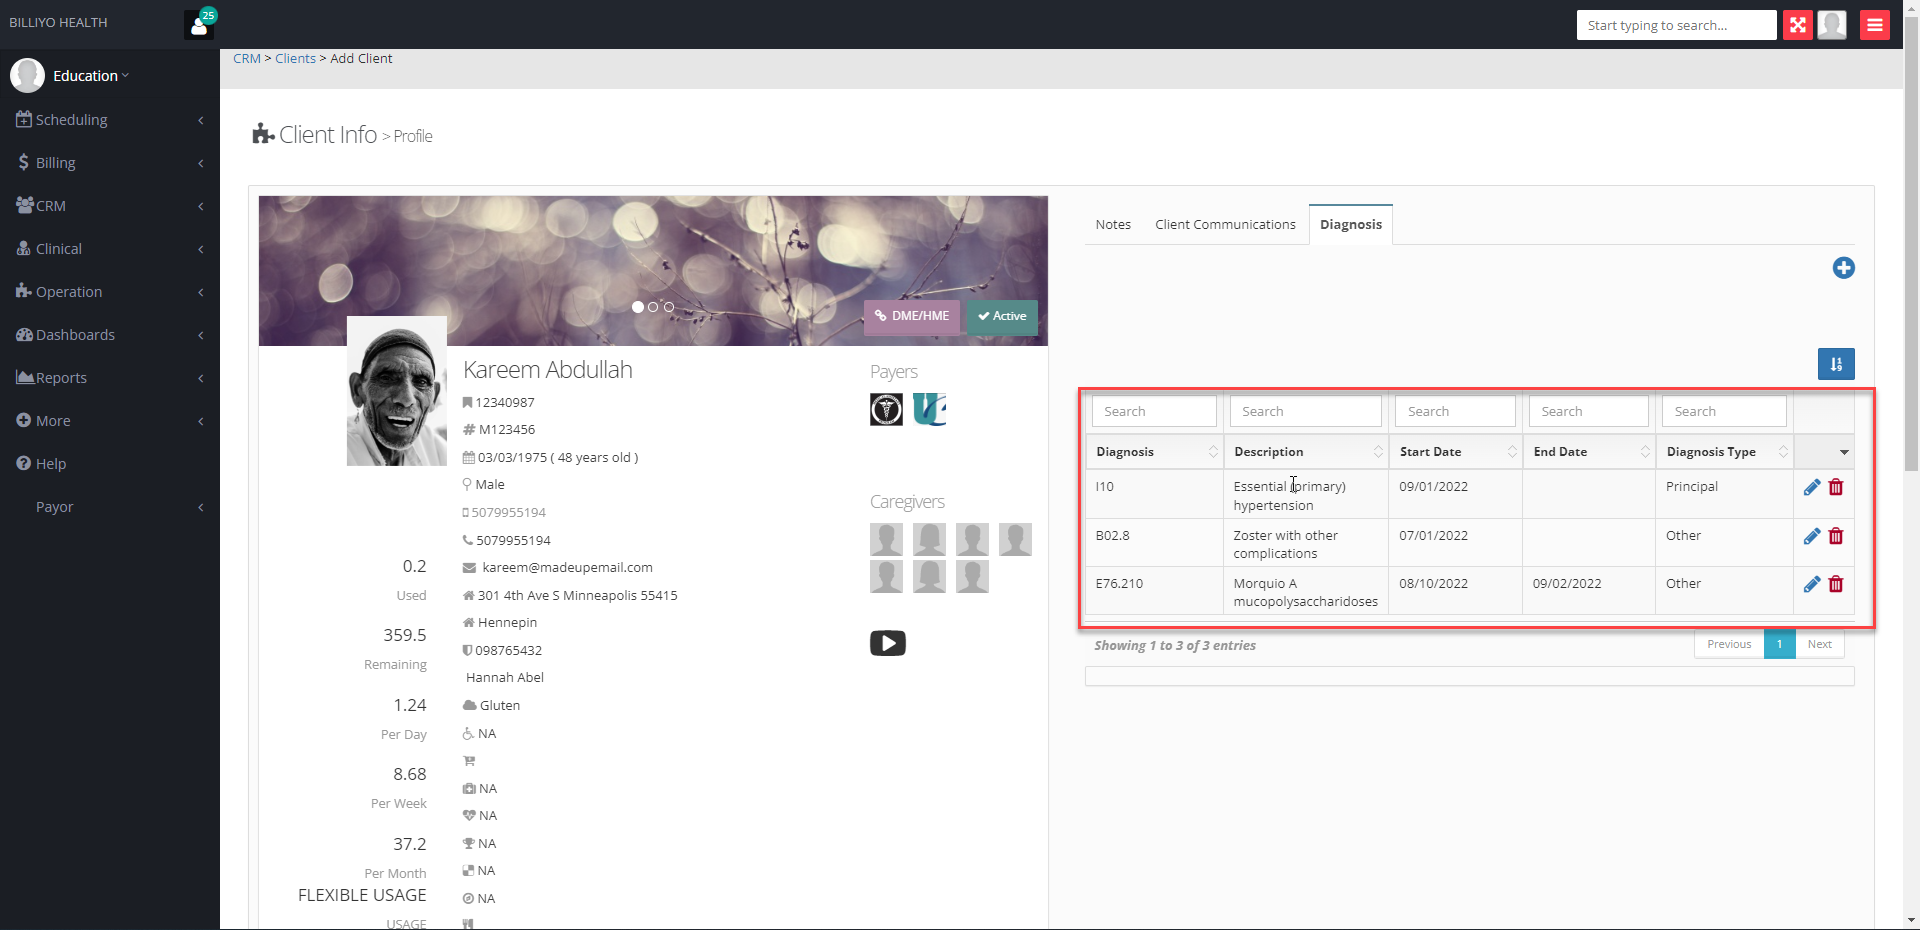
If their principal diagnosis code is incorrect, you’ll need to either edit the diagnosis (click on the blue pencil to the right of the diagnosis) or delete it (click on the red trashcan by the edit option) and add the correct principal. After correcting the diagnosis, you should be able to add the service authorization.
If the diagnosis code is correct, please refresh the page and attempt adding the service authorization again.
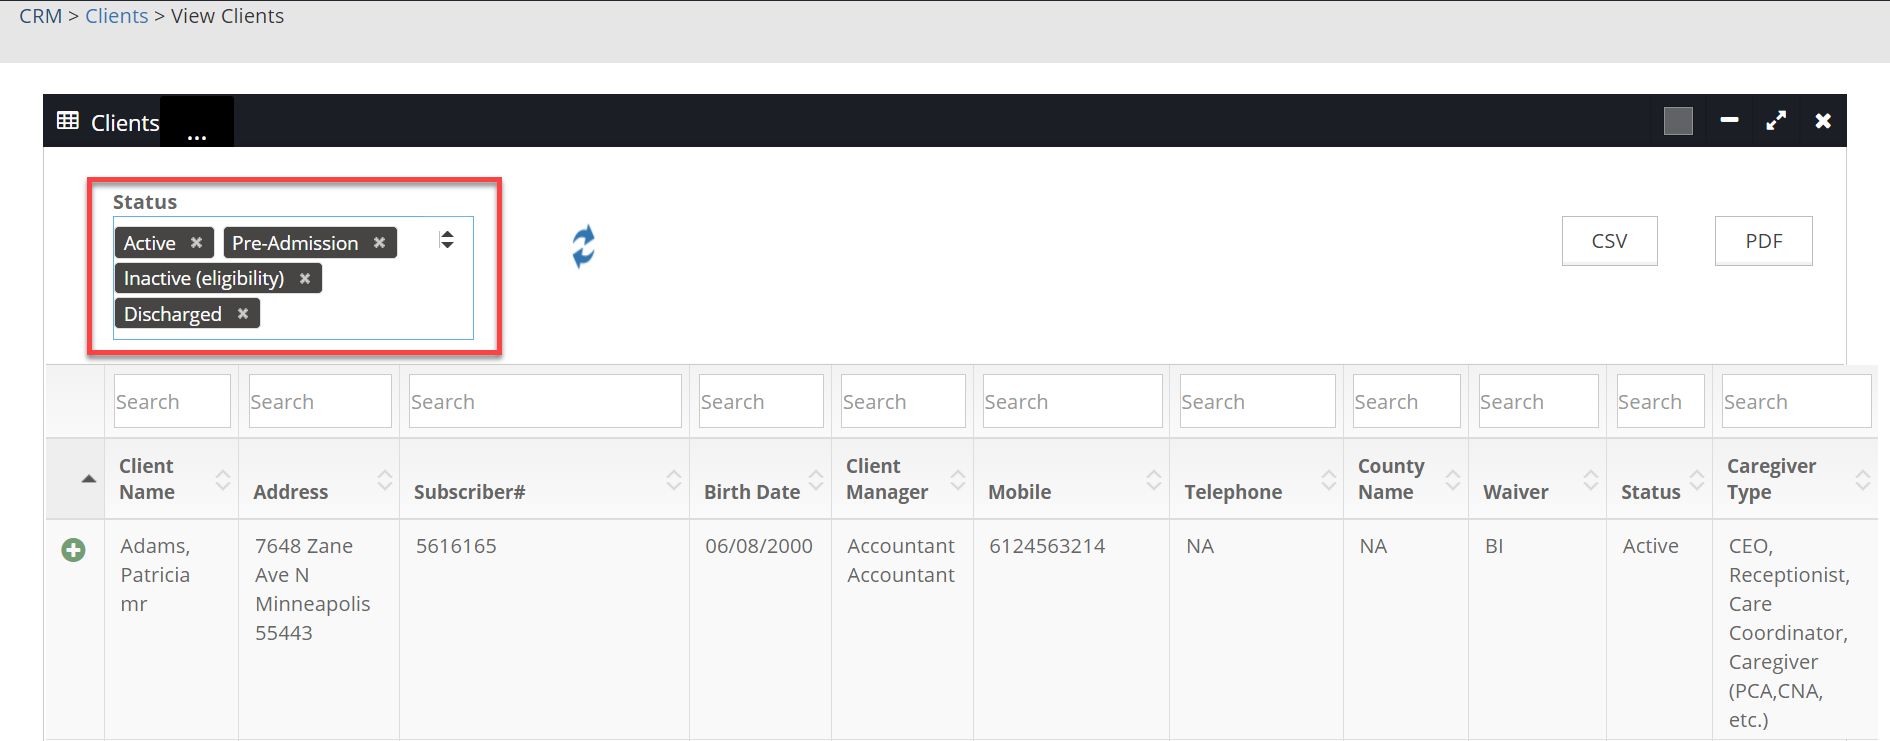
Why can't I find my client in the lookup?
A. Most likely, the client is in a non-active status (i.e., Pre-Admission, Inactive, Discharged).
Navigate to CRM > Clients > View Clients. Choose all status options in the 'Status' search box and click the blue refresh arrows.
To change a client’s status, click on the + sign to the left of their name and then the “Edit Client” button.
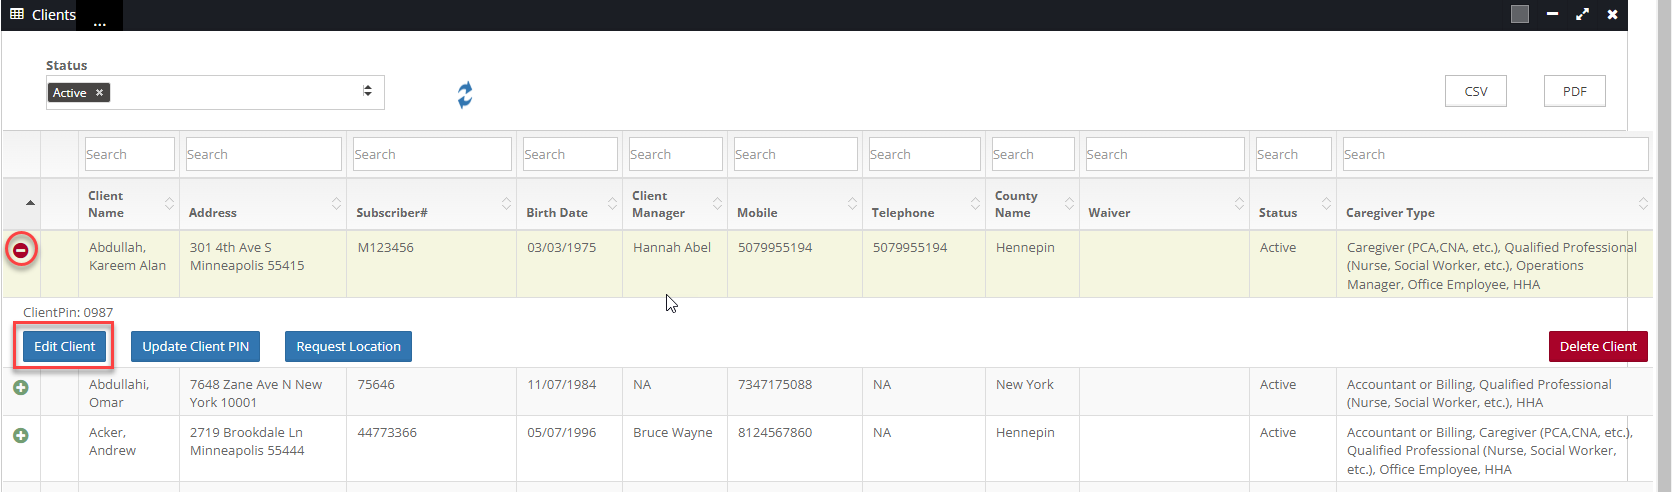
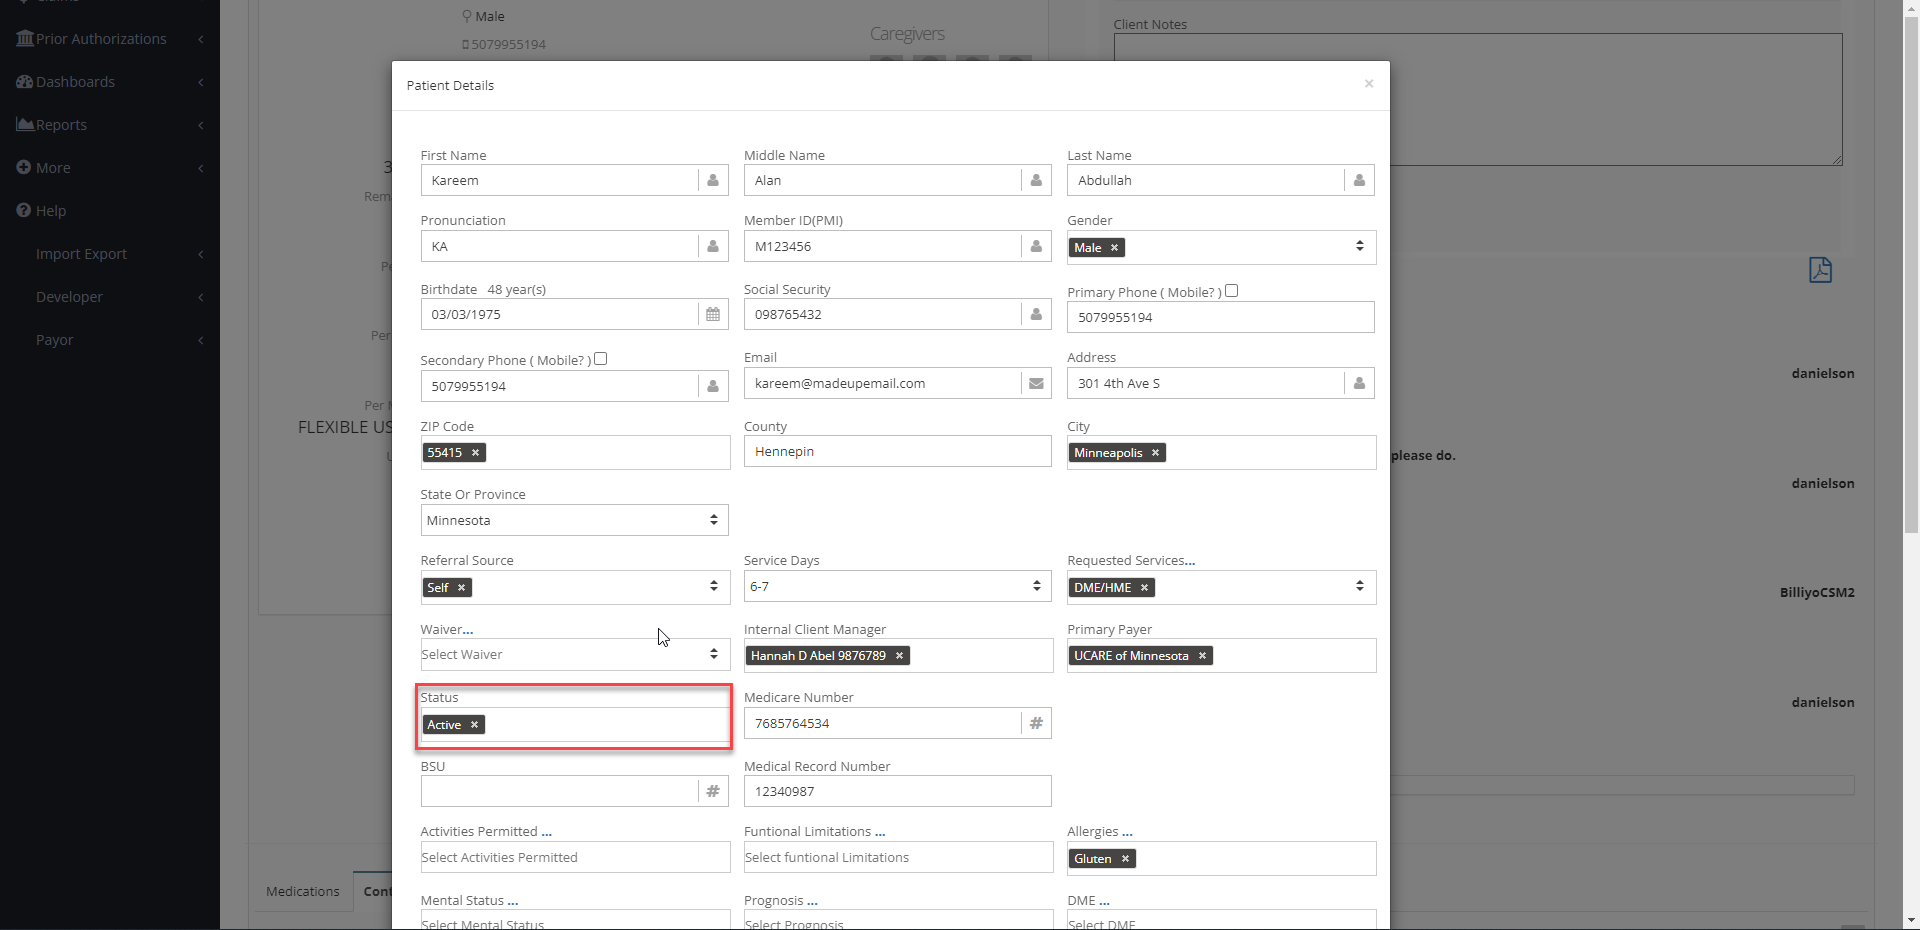
On the next screen, click on the “Edit Client Info” button. Then, locate the “Status” field and adjust accordingly. Click the “Save” button to apply the change.
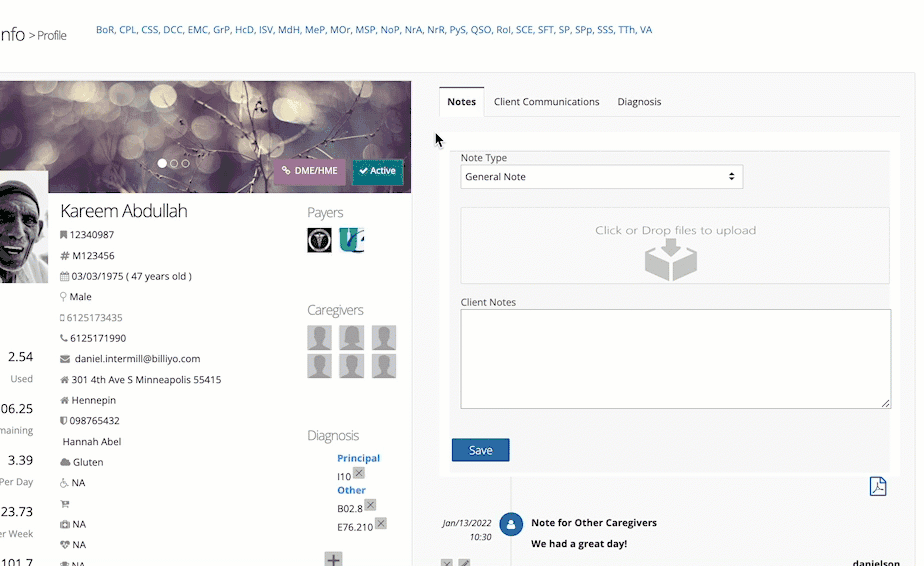
How do I add a diagnosis code?
A. To add a diagnosis code, head to the client’s profile. Within their profile, on the right side of the screen, there is a “Diagnosis” tab. Click into this and then click on the + sign to add the diagnosis code information — “End Date” is not required.
What do I do if a client, or employee, does not have a middle name but I need to enter one (for the payer)?
A. In the middle name field type the following: NMN
NMN = No Middle Name
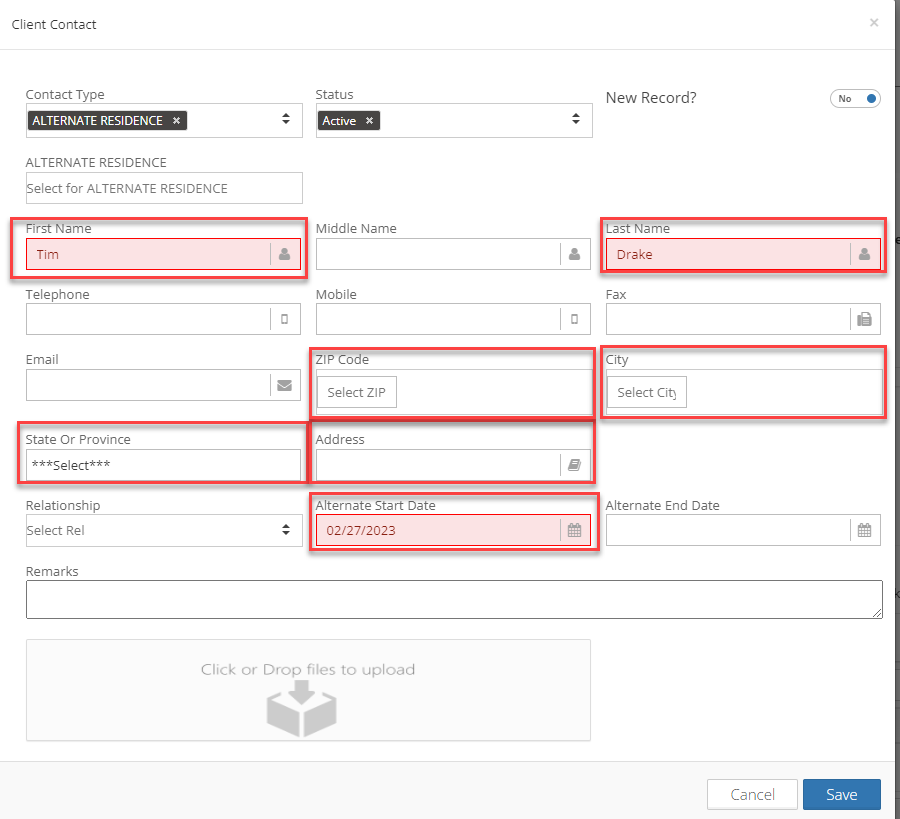
What if my patient has multiple address?
A. You can add alternate residences for a patient in the contacts section of their profile. Scroll to the bottom of the patient's profile and click into the Contacts tab. To add a contact click on the grey plus sign to the top right of the screen.
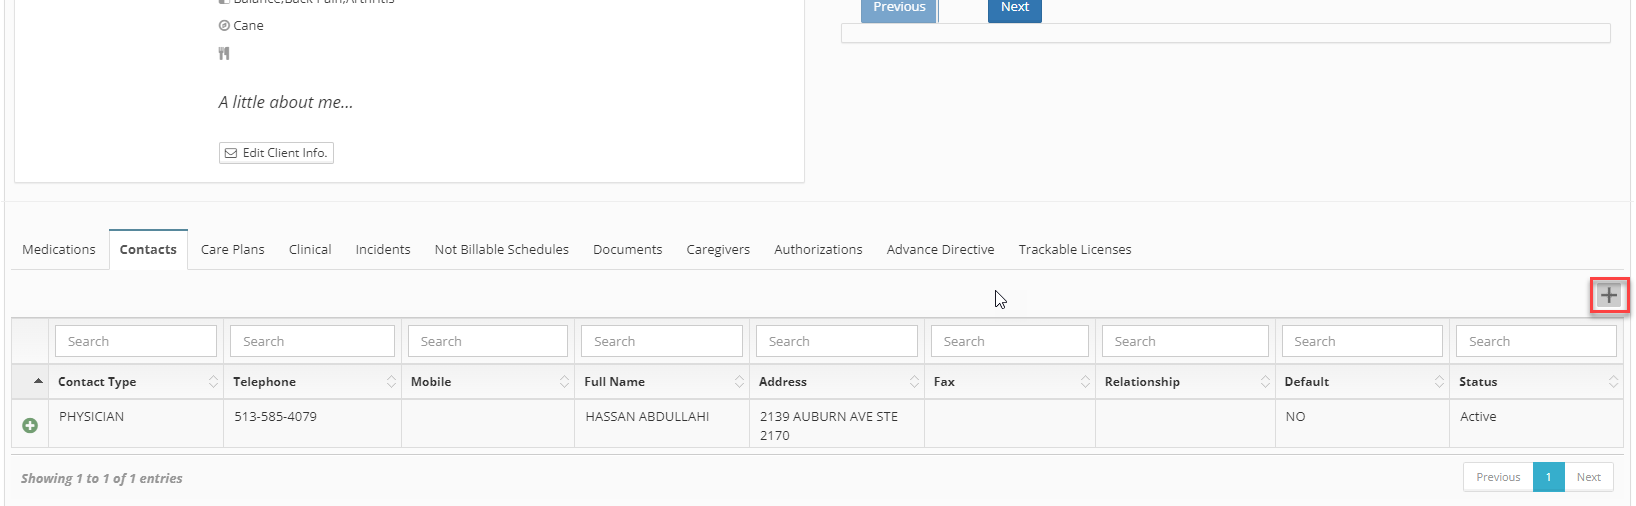
In the resulting pop up select "Alternate Residence" as the contact type. Then enter the residence's address, owner and when the patient began living there there.
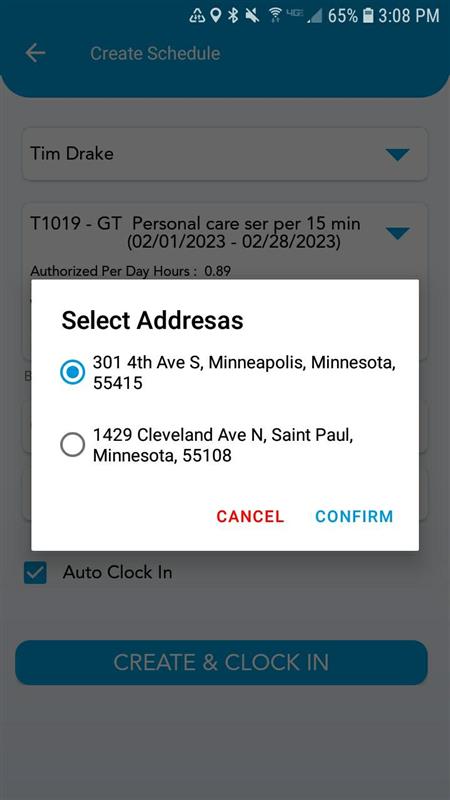
The alternate addresses you enter will pop up in your caregiver's app. When clocking in or out of a visit your caregivers will be able to select which residence they are working at.
Service Auths
How do I update an existing service authorization (SA)?
A. Locate the service authorization under CRM > Service Auth > Add/View SA. Click on the + sign to the left of the payer name and then the blue pencil icon.
After making changes, click the “Save Service Auth” button at the bottom.
If the service authorization number changed, the updated service authorization will need to be added as a new service authorization.
If updated service authorization has a different number from its predecessor, but overlaps its date range, then the original agreement will need to be closed out. To do this change the old agreement’s end date to the day before the updated service authorization starts, then the new service authorization can be added as normal. Finally create a care plan for this new agreement or connect the service auth to a preexisting care plan. You can then begin making schedules.
When should I use the "Add a New Line" button in a service authorization (SA)?
A. This button should be used to either add a new procedure code or when there are multiple date ranges listed for the same procedure code (each date range would be its own line). You may also need to add multiple lines if you change the usage type to "Strict Monthly"
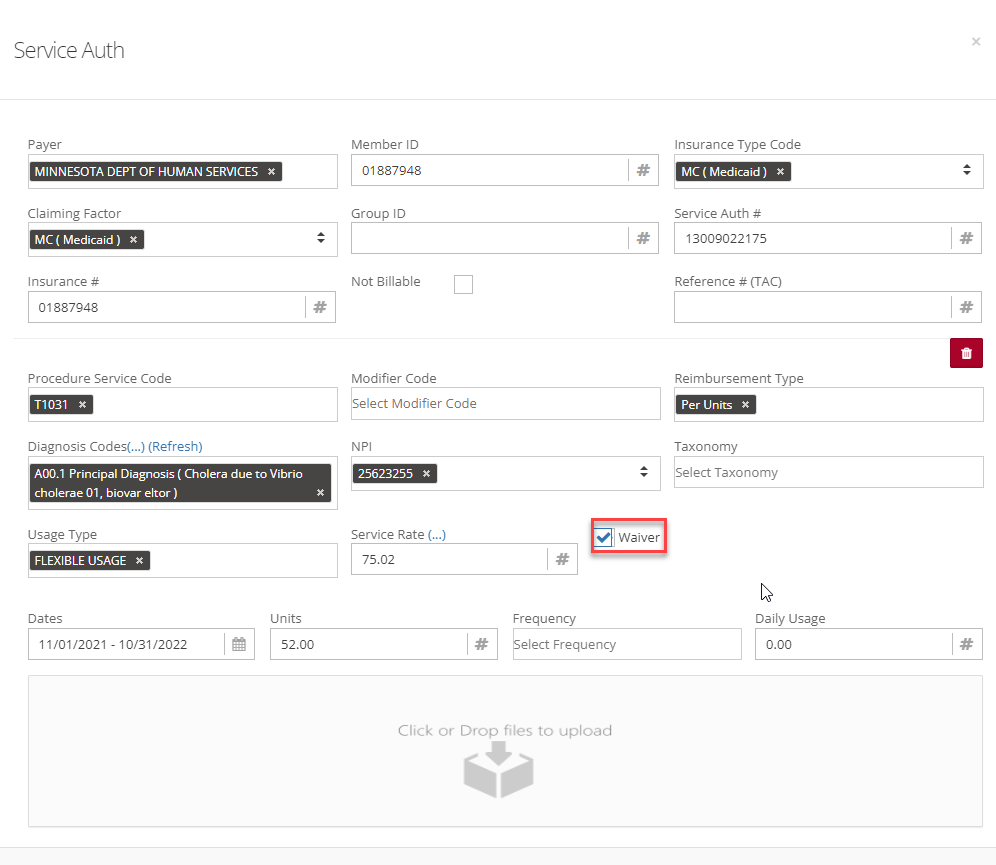
What does the waiver checkbox in a service authorization do?
A. While entering a service authorization there is a “waiver” check mark. This check mark determines if an agreement is offering a waiver service. If the waiver box is checked the Billiyo will treat the agreement as a waiver service and the agencies NPI/UMPI # will be sent with the claim instead of employee's UMPI.
If the waiver box is not checked then the agreement is not for a waiver service and the employee’s UMPI # will be sent with the claim.
What do I do when a Service Auth Expires, but the new one hasn't come in yet?
A. Manually create a non-billable, temporary SA that you can attach care plans to and make schedules for. Once the real SA comes in, update your non-billable agreement to reflect the new Service Auth. You can then send claims for it.
What the banked hours?
Banked hours are an estimation that shows, based on the schedules that have been made and worked, how many hours will be left at the end of a Service Auth if we continue to work the hours that are schedules.
For example a caregiver may be scheduled to work 3.5 hours, every day, for the duration of a Service Auth and this will use up all of their units. If the caregiver has been working 3.5 hours every day then their banked hours will be zero. However, if they only work 3 hours one day then the banked hour value will change to 0.5. This means that, if the caregiver keeps working at the rate they are scheduled to work, 3.5 hours, then they will have half an hour left over at the end of the agreement. If this this caregiver decided to work four hours one day then they will be using the left over time and their banked hours will return to 0.
Banked hours are calculated by:
Banked Hours = ( Expected Hours Per Day - Actual Hours Per Day ) * Total Number of Actual Worked Days
-
Expected Hours Per Day = How many hours have been scheduled
-
Total Service auth hours / Total Service authorization days
-
-
Actual Hours Per Day = How many hours have been worked
-
Total Working hours / Total Number of Actual Worked Days
-
How do I customize the services associated with my procedure codes?
By default Billiyo attaches common services to the procedure codes that your agency works.
However, this list can be customized. To tie additional services to a procedure code:
1. Navigate to More > Company > Company Settings.
2. Select the Service Plans tab.
3. Click the blue lines ![]() in the top right corner.
in the top right corner.
4. Select the following:
a. Type
b. Procedure code
c. Modifier (if applicable)
d. Service(s)
e. Click the 3 blue dots to add a service that is not listed
f. Click Save

What is the minimum distance recommended when using geo tracking?
A. 500 ft or 152 m
Why? GPS satellites broadcast their signals in space with a certain accuracy, but what you receive depends on additional factors — including satellite geometry, signal blockage, atmospheric conditions, and receiver design features/quality. To accommodate for these factors this is why we suggest such a distance.
To learn more about Geotracking and EVV click here!
How do I enable community visits?
In Billiyo we can approve clients for community visits on a caregiver-by-caregiver basis. When caregivers work a community visit, Billiyo will tell your EVV aggregator that the shift was approved to be worked outside of the home so the caregiver's location will not be at the client's address.
To enable community visits we will need to edit the client caregiver connection by simply ticking off the Allow Community Visits box.

After enabling community visits your caregiver will be able to select if they are seeing the client at their home or out in the community when they clock in/out of a shift.

How do I remove the client signature requirement?
By default, your client and caregiver are required to sign off of every visit that is worked. However, if your client has an RP, or the visit isn't subject to EVV, you may want bypass the client or caregiver signature. We can do this with the caregiver setting field in the caregiver connection page.
This field has three main options and each option has smaller setting setting under it.
Require client & care Signature - Both your client and your caregiver will need to sign each visit.
Enable Client Type Signature - Clients will type their name instead of tracing a signature with their finger
Enable employee Type Signature - Employees will type their name instead of tracing a signature with their finger
Do not require client & care signature - Your client and caregiver will not sign a visit when their shift ends. The client's RP will still need to sign off on the shift before you can turn it into a timesheet
Do not require RP signature - The client's RP does not need to sign the visit in order for it to be pulled into a timesheet
Do not require client signature - The client will not need to sign off on a shift, but the employee will be required to sign for the visit.
Do not require client & care signature - Both your client and your caregiver will need to sign each visit.
Do not require RP signature - The client's RP does not need to sign the visit in order for it to be pulled into a timesheet
Enable employee Type Signature - Employees will type their name instead of tracing a signature with their finger.
The options you can select depends on the main option that is chosen. For instance, if Require client & care Signature is selected then the enable type signature options will be available, but the Do not require RP signature option will be blocked.
If a visit is submitted with a missing client signatures, then the schedule approval page will prevent it from being turned into a timesheet.

However, if Do not require RP signature is selected, then we can turn these unsigned visits into a timesheet and bill for them.
Client Care Giver
What is the difference between EVV and geo tracking?
A. EVV verifies a person’s location. Geo tracking ensures that caregivers are in the correct location by preventing them from clocking in if they are too far from the patient's primary address.
Geo-tracking is an optional feature in Billiyo. It helps with EVV compliance but it is not required.
To learn more about EVV settings click here!
What is the minimum distance recommended when using geo tracking?
A. 330 ft or 100 m
Why? GPS satellites broadcast their signals in space with a certain accuracy, but what you receive depends on additional factors — including satellite geometry, signal blockage, atmospheric conditions, and receiver design features/quality. To accommodate for these factors this is why we suggest such a distance.
To learn more about Geotracking and EVV click here!
How do I enable community visits?
In Billiyo we can approve clients for community visits on a caregiver-by-caregiver basis. When caregivers work a community visit, Billiyo will tell your EVV aggregator that the shift was approved to be worked outside of the home so the caregiver's location will not be at the client's address.
To enable community visits we will need to edit the client caregiver connection by simply ticking off the Allow Community Visits box.
After enabling community visits your caregiver will be able to select if they are seeing the client at their home or out in the community when they clock in/out of a shift.
How do I remove the client signature requirement?
By default, your client and caregiver are required to sign off of every visit that is worked. However, if your client has an RP, or the visit isn't subject to EVV, you may want bypass the client or caregiver signature. We can do this with the caregiver setting field in the caregiver connection page.
This field has three main options and each option has smaller setting setting under it.
Require client & care Signature - Both your client and your caregiver will need to sign each visit.
Enable Client Type Signature - Clients will type their name instead of tracing a signature with their finger
Enable employee Type Signature - Employees will type their name instead of tracing a signature with their finger
Do not require client & care signature - Your client and caregiver will not sign a visit when their shift ends. The client's RP will still need to sign off on the shift before you can turn it into a timesheet
Do not require RP signature - The client's RP does not need to sign the visit in order for it to be pulled into a timesheet
Do not require client signature - The client will not need to sign off on a shift, but the employee will be required to sign for the visit.
Do not require client & care signature - Both your client and your caregiver will need to sign each visit.
Do not require RP signature - The client's RP does not need to sign the visit in order for it to be pulled into a timesheet
Enable employee Type Signature - Employees will type their name instead of tracing a signature with their finger.
The options you can select depends on the main option that is chosen. For instance, if Require client & care Signature is selected then the enable type signature options will be available, but the Do not require RP signature option will be blocked.
If a visit is submitted with a missing client signatures, then the schedule approval page will prevent it from being turned into a timesheet.
However, if Do not require RP signature is selected, then we can turn these unsigned visits into a timesheet and bill for them.