Jump To:
How to Access the Schedules Approval Page
Reviewing Schedules
Account Settings
Webinar
How to Access the Schedules Approval Page
To access the schedules approval page, head to Scheduling > Schedules Approval.
.gif?width=670&height=377&name=ScreenFlow%20(29).gif)

Reviewing Schedules
When going to the schedules approval page, a list of schedules will appear initially. This list will show us an overview of the schedules that were worked, to view individual visits, and turn them into a timesheet, we will first need to select a client and then hit the blue refresh arrows.
If you can't see the visit you want after searching for a client, make sure to check the date range next to the client filter. The day you want to review should be included in this field.
Like many Pages in Billiyo this Page has Filters.
By Default the Page will show "All Schedules".
To Filter For Supervisory Visits- Use the Filter "Supervisory Schedules".
S5116 U9 now shows in "Supervisory Schedules" which is formally known ad "UA Schedules".
To Filter for Skilled Care- Use the Filter "Per Visit Schedules".
To Filter For Schedules Missing Signatures- Use the Filter's:
"Caregiver Signature Missing"
"Client Signature Missing"
"RP Signature Missing"
After filtering for a client, and locating their shift(s), we can click on the eye icon ![]() (under the Action heading) to see their visits in more details.
(under the Action heading) to see their visits in more details.
Service and Notes
In the schedule approval page, we can see you employee's service notes by clicking on the "..." in the services column.
This will trigger a pop up where you can see the status of each service, as well as the visit notes, that were entered during the visit page.

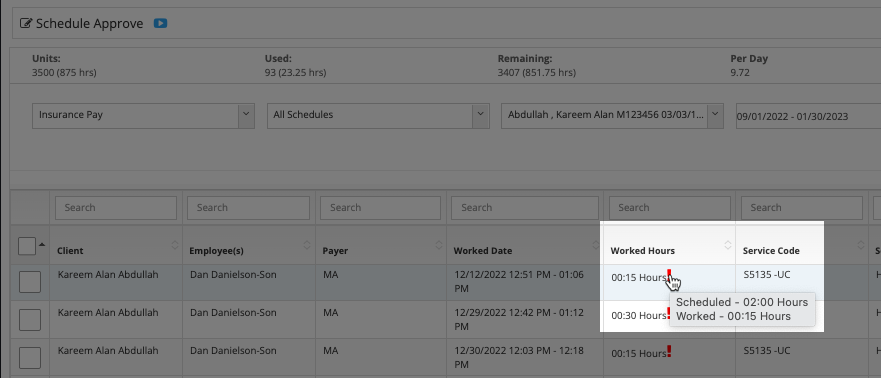
Worked Hours
In the scheduled approval page, we can also review the hours that our caregivers worked and compare them to what was scheduled. A visit may have an ![]() in the "Worked Hours" column. This indicates that the amount of time that was worked was either more or less than what was scheduled.
in the "Worked Hours" column. This indicates that the amount of time that was worked was either more or less than what was scheduled.
Hovering over the ![]() will display the worked hours and the scheduled hours.
will display the worked hours and the scheduled hours.
The ![]() indicator does not stop us from approving the schedule or generating a timesheet. Instead, it is just an alert to make sure that the schedule gets reviewed.
indicator does not stop us from approving the schedule or generating a timesheet. Instead, it is just an alert to make sure that the schedule gets reviewed.
Account Settings
Within the company settings in an account, the ability to change between one-step or two-step schedules approval + timesheet generation can be found.
To adjust this setting, head to "More" > "Company" > "Company Settings". On the screen that appears click on the Configurations tab and then the blue pencil icon towards the top right corner.
On the pop-up that appears locate the Approve and timesheet with one click checkbox.
If the checkbox is checked, a one-step approval process will be used for the account. If the checkbox is unchecked, a two-step approval process will be used for the account.
Make sure to click the Update button to save the changes.
.gif?width=670&name=ScreenFlow%20(14).gif)
Webinar